Page 2 of 2 FirstFirst 12
Results 11 to 15 of 15
  1. #11
    Senior Member BillyBob58's Avatar
    Join Date
    Jan 2007
    Location
    Tupelo, MS
    Posts
    11,108
    Images
    489
    I have the old original war bonnet yeti which was made up of removable layers of Climashield.

    There was a huge differential between the inner layer and the outer layer. Then, single layers of 2.5 ounce per square yard Climashield were sewn to the inner shell on the outer edge. Or, at least the first, and only permanent, layer, was sewn around the perimeter of inside shell. There was even a differential built into each layer. When I added a layer, if memory serves, I was supposed to attache(quilt/sew) the edge of each new layer about 3/4"(?) inside the curve of the outer edge of the 1st layer. This was to adjust not just for the outer shell, to keep it from smashing the loft of the insulation. But to adjust as the loft kept getting thicker and further away from the user, the outside circle is bigger, like running on each lane further to the outside of a track has to be staggered so that the outside runner is not running an unfair distance. Adding the layers this way left a bunch of loose wrinkles when the UQ was laying flat. But this all pulled tighter and just snug enough when curved around a back and hammock. What a brilliant design!

    So, if attaching the edge of the outside layer of Climashield to the same position on the shell edge as the inside layer, when the UQ is curved snugly around my back, it will end up being pulled tighter and lose some of it's loft.

    But, I think I figured out a better way to handle that when I add a layer back. I wrap the inside out UQ around an ironing board, which puts a curve into the UQ similar to it being curved around my back when I'm in the hammock. Then I just lay the new layers on top so that there is no tension on them, and quilt the outer edge at the point where it lands. Then I can pull the quilt very snug against my back with no compression of layers. Seems to work.

    The outer layer is actually a lot more than just a differential cut, since in this case all insulation layers are either sewn to the innner shell, or just to the other layers of insulation. So, ther is no down which needs to loft up towards the inner shell, filling some chambers. Thus, the outer shell hangs loose enough below the outermost layer of insulation that I can stuff a down vest or other clothing in there, between the CS and the outer shell. Resulting in truly awesome loft. I always thought this UQ design was one of the best any one ever came up with.

    But, on the subject of dif cuts for synthetic UQs: yes, I think it is needed if I expect to get the max out of the synthetic insulation. No benefit to crushing the loft.

    Bill

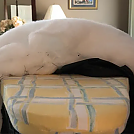
    curved around an iron board 1 permanent layer of Climashield installed, about to add other layers:


    .................................................. .......

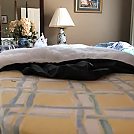
    3 more layers added:
    Last edited by BillyBob58; 12-15-2021 at 22:20.

  2. #12
    Senior Member
    Join Date
    Sep 2021
    Location
    SW Wisconsin
    Hammock
    Gold Armour 10.4
    Tarp
    Gold Armour 10x12
    Insulation
    DIY synthetic 30*
    Suspension
    Spider straps
    Posts
    229
    Thanks for the explanation. The ironing board trick is an awesome idea.

  3. #13
    Senior Member
    Join Date
    Sep 2021
    Location
    SW Wisconsin
    Hammock
    Gold Armour 10.4
    Tarp
    Gold Armour 10x12
    Insulation
    DIY synthetic 30*
    Suspension
    Spider straps
    Posts
    229
    I looked at the program, and it appears that a single baffle 1.3" high, (climashield 5.0 is 1.2"thick) would make the differential 8" between the inner and outer fabric. If it doesn't work out, I have a seam ripper, and I ain't afraid to use it.

  4. #14
    Member
    Join Date
    Dec 2021
    Location
    Richmond, Missouri
    Hammock
    DIY 11’ netless
    Tarp
    Eno Profly
    Insulation
    HG
    Suspension
    DIY Amsteel UCR
    Posts
    58
    I have been thinking about making a double layer hammock with Apex integrated in between the layers, which of course made me think about the solution to the differential cut question as well. The concept I came up with was to use two different layers of Apex with varying density between them. I originally planned on using a single piece of 6.0 and constructing it much like the RBTR UQ kit, but instead decided to use a 5.0 cut to fit the narrower top layer of fabric, and a 2.5 cut to fit the bottom wider layer of fabric. The plan is to use some backing tape so the Apex doesn’t get hung up when I sandwich all four layers together and run it through the sewing machine. By varying density I plan to “tear” the 2.5oz layer much like the Apex pillow kit Dutch sells calls for in order to create more loft and lower density. This will of course cause that 2.5oz layer to lose some of its insulation properties, but the main purpose of it is to fill the void at the bottom created by using synthetic insulation and a differential cut. The 5.0oz layer that is sized for the narrower top layer will be the primary insulation layer, and should stay snug but not squish when laying in the hammock, and any squish that happens with be transferred to the lower density, higher lofted 2.5oz layer. Sort of like a dual-rate spring.
    Picture is my prototype thus far, with ugly anchoring seams since I hadn’t yet though of using backing tape yet and anchored the insulation to the fabric separately first.
    Attached Images Attached Images

  5. #15
    Senior Member WV's Avatar
    Join Date
    Feb 2008
    Location
    southeast WV
    Hammock
    DIY
    Posts
    4,820
    Images
    208
    Some of the techniques I use in making hybrid insulated hammocks or underquilts may be useful. For me, an insulating layer is only as warm as its thinnest spot. That's the cause of cold butt syndrome or cold feet from heel pressure. Of course, eliminating gaps and air leaks is essential, too. My aim has been to make insulation with uniform thickness by making the bottom insulation the same shape as a hammock with a body (including heels and butt) in it. Many people have worked on this, going back to Tewa, Just Jeff, Youngblood, and beyond. I don't know who first put darts in a flat quilt to make it curve. I tried to refine that curved shape by measuring an occupied hammock and duplicating the curves by applying the measurements to patterns for the underquilt or bottom layer. Taken to ridiculous ends (which I did), it produces an amazing match. Here's a picture of a bridge hammock with triangles drawn on it. Don't despair - I later tried a simpler set of measurements using fewer and larger triangles, and it worked almost as well (and much better than a flat quilt with some side and end darts). At this point, let me stress that this would work for any type of hammock, not just the PBH. Here are the three techniques I suggest you borrow.

    1) Completely cover the hammock with triangles. There are markers that wash off, but I like Sharpie pens (which don't). With someone about your size in the hammock, measure each side of each triangle. Make paper models of the triangles (cheapest source for material is ugly wrapping paper on sale after Christmas.) Bonus for bridge hammock users: they are symetrical, so you only need to measure one half. But wait! This gives you something exactly (ok, mostly) the same shape and size as the hammock. You need something the same shape, but bigger, to leave room for the insulation. Trial and error says each measurement should be multiplied by 1.25. Fit some of the triangles together to make a flat (but oddly shaped) panel that runs across the hammock from side to side. For the hammock pictured, it only took 9 panels. Then add 1/2 inch around each panel for seam allowance.

    2.) Cut out fabric and insulation to match the panel patterns, and sew the insulation to each panel. (PM me for tips if you do this.) Then sew the panels together to make the insulating layer. Pin it to the hammock and adjust (with someone in the hammock). If you're making an underquilt, you make the top layer the same way, but don't multiply the measurements by 1.25. Sew around the edges. Before you sew the last end, ...

    3.) Life isn't perfect, and neither is your insulation layer. There's some kind of gap between the top of the insulation and the bottom of the hammock in two places, under your heels and under your butt, because you left them there on purpose when you adjusted in step 2. Throw an ounce or two of down in there, on top of the insulation. It will loft and there won't be any mini-convective air currents in those gaps.

    Good luck.
    David

  • + New Posts
  • Page 2 of 2 FirstFirst 12

    Similar Threads

    1. Apex CS Underquilt and Differential Cut?
      By Hunter55 in forum Do-It-Yourself (DIY)
      Replies: 37
      Last Post: 06-24-2015, 19:22
    2. Differential cut for a non-down underquilt
      By Country Roads in forum Do-It-Yourself (DIY)
      Replies: 4
      Last Post: 01-02-2015, 18:44
    3. Differential underquilt vs. Non-differential UQ
      By HappyCamper in forum Under Quilts
      Replies: 35
      Last Post: 02-27-2013, 13:29
    4. My take on a 3/4 differential underquilt
      By Living the Highlife in forum Do-It-Yourself (DIY)
      Replies: 5
      Last Post: 10-08-2012, 22:10

    Bookmarks

    Posting Permissions

    • You may not post new threads
    • You may not post replies
    • You may not post attachments
    • You may not edit your posts
    •