Page 1 of 2 12 LastLast
Results 1 to 10 of 14
  1. #1

    Join Date
    Jul 2015
    Location
    Pittsburgh, PA
    Hammock
    DIY ROBIC
    Tarp
    OES MacCat SilPoly
    Insulation
    down bag, Klymit
    Suspension
    Kevlar+Str.Anchors
    Posts
    741

    Incremental improvements - hammock bikepacking.

    Ever since trying out a hammock for bikepacking last year -- with help from this forum -- I've been tinkering with my setup. Tinkering + hammocks = lotsa fun! So I figured some of you might be interested in the process and results.

    So last year I was set to go on a bikepacking trip and wanted to travel light, but not spend much money. (Technically impossible, I know, but I still wanted to try.) I had a hammock sitting in a drawer and figured that would make a better sleeping place than a bivy, a.k.a. a human-sized Ziploc bag.

    Thanks to this forum, I realized that 1.) I'd need a bugnet, and 2.) I could make one. I happened to recall I had some old sheer curtains in the back of the linen closet. Also had a sewing machine... er, thread injector... given to me by a friend years ago that was in need of a project. So I sewed the curtains together and made a very simple bugnet. It's basically just a big sheet of sheer polyester hung over a ridgeline.

    Here it is on a test run in the local woods...
    IMG_1435.jpg

    I did not get into under/top quilts, but counted on just using my good ol' REI 25º down bag. The only sleeping pad I had was a huge Thermarest for car camping...not gonna work. I happened to see an intriguing review in Adventure Cyclist magazine for the Klymit Inertia X Frame pad. Bought it and it works well. The holes do seem to keep the down from squishing. Sometimes I put it inside the sleeping bag (when it's colder and I'm wearing layers) and that keeps it from migrating around. I've slept in this combo down to the low 40's and have been comfortable -- same range as I get with this sleeping bag in a tent. (I'm a cold sleeper!)

    P8130073 (1).jpg

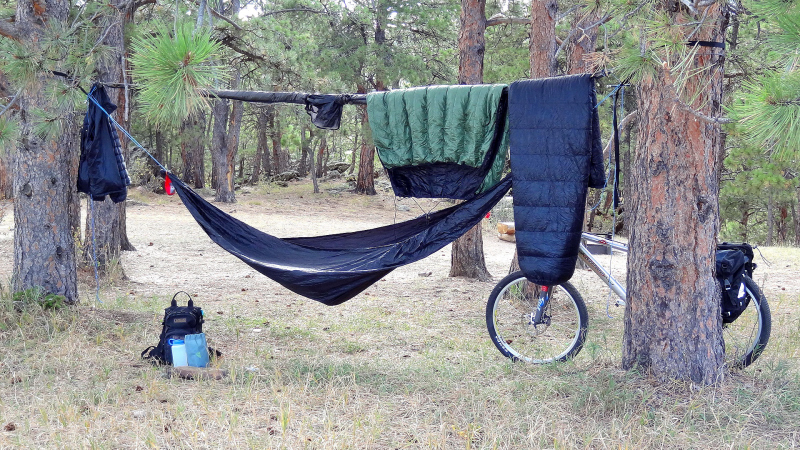
    I did spend a bit of dough on an ENO tarp to cover it all. Here's the result:

    P8140232 (1).jpg

    Obviously had not perfected the tarp hang at this point... especially this instance, as we had arrived at the campsite well after dark and after a lot of tough miles on the bike. Not pictured -- the big rock hidden in the ferns that poked me in the butt while hanging.

    Here's a photo of my complete bike setup on that trip. The hammock, tarp, bugnet, and pad are all in the seatbag. Obviously some bulk could be trimmed there.

    P8140295 (1).jpg

    And on that note, next up, a new tarp and Dutch bling added to the mix...

  2. #2

    Join Date
    Jul 2015
    Location
    Pittsburgh, PA
    Hammock
    DIY ROBIC
    Tarp
    OES MacCat SilPoly
    Insulation
    down bag, Klymit
    Suspension
    Kevlar+Str.Anchors
    Posts
    741
    After a couple trips last year with this setup, I began thinking how to cut down on weight and bulk. My tarp was a prime target. This was the basic ENO ProFly tarp, coming in at a whopping 22oz. and taking up slightly more than half of my seat bag. I liked the coverage but not carrying it around.

    In May, I did a bit of googling and found the OES site. Then I invoked REI's generous return policy and took the ENO tarp back, while ordering a MacCat Standard in silnylon. It came pretty promptly. I got it and realized I really didn't like the brown color, so sent it back for a grey one. That one took a while. But I won't complain about cottage-level guys taking some extra time. It's worth it, in my opinion. Besides, I did not have any firm dates for trips planned, and the weather in the whole eastern half of the U.S. was crap for bikepacking until just a couple weeks ago. Also got upgraded to silpoly for the wait.

    So here is the setup with the new tarp:
    OES_tarp_1.jpg
    OES_tarp_2.jpg

    Obviously still not taut... I had forgotten to pick up line-locs before leaving for this trip, and had to improvise some adjustable knots. Don't know what you call these noose-style wrapped knots, but they worked well enough here, with no wind and little rain.

    ground_lines.jpg

    Also I see from everyone else's photos that my tarp sides are generally pretty low... would be more convenient most times to set them higher, and to use porch mode once in a while. Here the tarp was also kind of high up compared to the hammock. My curtain-style bugnet was sticking out, and got a bit wet on the edges. I have since discovered that other folks on this forum have done simple curtain-style nets... but I'm going to finish it off in the Fronkey style, as that will eliminate those pesky corners and be more secure.

    I had bought some cheap cord and Nite Ize CamJam things to hang my tarp. While this was an improvement over merely tying the tarp with crappy knots in the crappy cord that came with the ENO, this setup still did not work so well -- even set after the tree, the CamJams kept getting pulled perpendicular to the cord, causing the cord to pop out. I had to wrap extra line around the whole mess to keep it in place.

    camlock.jpg

    The obvious next step was a Dutch continuous ridgeline complete with Dutch Hook and Stinger -- just got it last week. I also got four Tarpworms for the ground lines. Been messing with those, and my bugnet, in preparation for a short trip next week. (Photos later.) I'm almost as excited about busting out the new bling as I am about the trip!

    Meanwhile, enjoy this photo from the last trip, the stream near our campsite the first night:
    P7110049_web.jpg

  3. #3
    Herder of Cats OutandBack's Avatar
    Join Date
    Dec 2010
    Location
    Denver, CO
    Posts
    8,761
    Images
    129
    Nice report. Looks like your bike hammock kit is coming along well. I also like taking my hammock on bike trips. Space is always a premium with bike bags.


  4. #4

    Join Date
    Jul 2015
    Location
    Pittsburgh, PA
    Hammock
    DIY ROBIC
    Tarp
    OES MacCat SilPoly
    Insulation
    down bag, Klymit
    Suspension
    Kevlar+Str.Anchors
    Posts
    741
    Nice shot, OutandBack. Where is that?

  5. #5
    Herder of Cats OutandBack's Avatar
    Join Date
    Dec 2010
    Location
    Denver, CO
    Posts
    8,761
    Images
    129
    Quote Originally Posted by KBr00ks View Post
    Nice shot, OutandBack. Where is that?
    Glenwood Canyon in Western Colorado right along I-70.

    https://www.flickr.com/photos/outand...57631838923828

  6. #6

    Join Date
    Jul 2015
    Location
    Pittsburgh, PA
    Hammock
    DIY ROBIC
    Tarp
    OES MacCat SilPoly
    Insulation
    down bag, Klymit
    Suspension
    Kevlar+Str.Anchors
    Posts
    741
    Next: cutting off those dangling corners of my bug-curtains and sewing a proper Fronkey-style bugnet.

    Somehow I'd gotten the impression this was a complicated procedure; not at all. No more difficult than patching all the holes in the curtains from whatever cat had tried to climb up them. Got some shock cord and locks, plus a continuous ridgeline complete with Wasp and Hook, from Dutch and it's all set.

    sewn_bugnet_.jpg

    Except... dangit, there's another rip in it.

    bugnet_tear.jpg

    I thought the fabric was reasonably resilient... I had tore it once before, but that was by accidentally sitting on top of it while it was attached to one side of the hammock. But this time I'm not sure how it tore. I think it got snagged on the Velcro closure of my seat bag. Placed another Dutch order with some Nano-see-um to start fresh (though I guess I'll still have to be careful about that snagging on the Velcro, too).

    I've been thinking about other possible designs for a bugnet. As is, I wrap the tarp, continuous ridgeline, and bugnet all up in a ball and stuff it in the seat bag. This works OK, but some snakeskins would make it even easier to set up and take down, especially if it's raining. However, I don't think I could roll up the Fronkey-style bugnet + tarp in skins if the hammock is still hung... does this make sense? Anyone tried it? I think I'd have to disconnect one side and then the other. No big deal, but if, for instance, I'd like to keep the tarp + bugnet out of the way to look at the stars but then the weather turned foul, it wouldn't be all that quick to deploy.

  7. #7
    Herder of Cats OutandBack's Avatar
    Join Date
    Dec 2010
    Location
    Denver, CO
    Posts
    8,761
    Images
    129
    Your tarp should be completely seperate from your hammock. You idea of a bugnet with the tarp in skins should work if you suspend the bugnet from the tarps ridgeline instead of the hammocks. clear as mud right? Here's a picture of my tarp in skins. If you suspended the bugnet from the tarps RL it would have to be hung much closer to the hammock. Unless you designed the bugnet with longer sides.


    When space is a premium in my bikebags I just sleep with a fishermans hat type bugnet on and deet on my hands incase one of them pop out from under my quilt.

  8. #8

    Join Date
    Jul 2015
    Location
    Pittsburgh, PA
    Hammock
    DIY ROBIC
    Tarp
    OES MacCat SilPoly
    Insulation
    down bag, Klymit
    Suspension
    Kevlar+Str.Anchors
    Posts
    741
    Pictures do help!

    I don't actually use a hammock ridgeline, just the one for the tarp + bugnet (the reason I went continuous is for the bugnet). I guess I was thinking that because the bugnet's opening at the bottom is now smaller, and the ends sewn together, I couldn't get it up over the hammock to roll up into skins... the hammock suspension would catch on the bottom opening.

    More mud thrown into the mix?

  9. #9
    Herder of Cats OutandBack's Avatar
    Join Date
    Dec 2010
    Location
    Denver, CO
    Posts
    8,761
    Images
    129
    Quote Originally Posted by KBr00ks View Post
    Pictures do help!

    I don't actually use a hammock ridgeline, just the one for the tarp + bugnet (the reason I went continuous is for the bugnet). I guess I was thinking that because the bugnet's opening at the bottom is now smaller, and the ends sewn together, I couldn't get it up over the hammock to roll up into skins... the hammock suspension would catch on the bottom opening.

    More mud thrown into the mix?
    Ah, I get you. I did not think about that. Since you are buying new bugnet material maybe you could change the design a little so that would not happen.
    Or you could add dogbones and Dutch slyle hammock hooks at each end of the hammock. That would make installing and detaching the net pretty fast and painless.

    EDIT: the dutch hook I was suggesting. The dogbone(he is using a continous loop) and hook is at 1:16
    https://youtu.be/FN8VlDofU8o
    Last edited by OutandBack; 08-02-2015 at 15:21.

  10. #10

    Join Date
    Jul 2015
    Location
    Pittsburgh, PA
    Hammock
    DIY ROBIC
    Tarp
    OES MacCat SilPoly
    Insulation
    down bag, Klymit
    Suspension
    Kevlar+Str.Anchors
    Posts
    741
    As it happens, I have Kevlar straps from Dutch and Strap Anchors from BIAS both arriving tomorrow. I'll experiment with that setup and see if it's easy enough to briefly unhook the hammock in order to drape the bugnet properly.

    Also need to do some more poking around on this site to find other bugnet designs...

  • + New Posts
  • Page 1 of 2 12 LastLast

    Similar Threads

    1. Bikepacking with a hammock?
      By Highbinder in forum General Hammock Talk
      Replies: 12
      Last Post: 06-08-2013, 21:42
    2. Bikepacking and Hammock!
      By unsponsored in forum General Hammock Talk
      Replies: 6
      Last Post: 09-09-2011, 10:24

    Tags for this Thread

    Bookmarks

    Posting Permissions

    • You may not post new threads
    • You may not post replies
    • You may not post attachments
    • You may not edit your posts
    •