

Here's some pics of the new olive green bridge hammock with Dutch speed hooks with detail pictures for each connection.

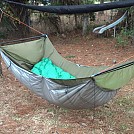
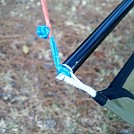

You'll have to click on each to see the comments for them.


Here's some pics of the new olive green bridge hammock with Dutch speed hooks with detail pictures for each connection.
You'll have to click on each to see the comments for them.
Last edited by stoikurt; 11-12-2014 at 09:42.
Stoikurt
"Work to Live...Don't Live to Work!"

Thanks for the pictures and the extra details on your ridgeline.
What are the dimensions of both of your bridges?
Both are 76" long. The camo spreader is 36" at the head and 26" at the foot, the olive is 36" on both ends. Material for the olive hammock was cut at 54" wide while the camo hammock tapers to 46" at the foot.Originally Posted by Dave-O

The weight of the olive hammock with suspension and poles comes in at 1 lb. 10.6 ounces (hammock with triangles = 13.4 oz., straps with cord and speed hook = 2.8 oz., and poles with bag = 10.4 oz.). The body of the camo = 8.7 oz. but that's w/ diamond knot loops but no triangle.
I really like the feel of of the olive hammock which provides a little extra foot room. But HYOH.
Stoikurt
"Work to Live...Don't Live to Work!"
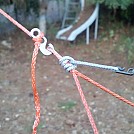
Beautiful job, stoikurt. Grizz will be pleased to see so many of his ideas so cleanly executed. If the locked brummel at the apex proves unsatisfactory, you could use an alpine butterfly knot, but I expect it will be fine, especially with the ridgeline attachment providing compression over the brummel's pass-through. Nifty!
Great Idea on the Brummel!
As somebody who jumped in- Don't be scared
I waited until I had a 60% off Jo-Ann coupon and got their 1.9oz ripstop for $3 or so a yard.
In watching Grizz's paper-folding exercises I stuck with the 1/4 pattern- It doesn't seem as critical that your curve be perfect, mainly that it is symentrical- folding the fabric and making one cut ensures that.
Webbing is easier to get right than a channel, especially with a guide foot of some sort.
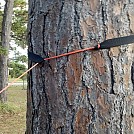
Oak survey stakes make a fine bridge spreader for experimenting- if you like what you got then order up poles- but those get you by just fine. A light notch with a saw is all you need to wedge them in the suspension lines.
Caps- I used cardboard scraps and pushed them into the ends, trimming a bit here or there to spread the fabric even.
It looks so horribly complicated, but after a bit a bulb goes on and it's not too hard to do (since Grizz did all the hard work!)

Grizz is pleased. Nice job stoikurt, I know you've been thinking about doing this for a long time, and you've done it well.
r.e. triangle apex, I've used a very similar technique as you discovered, with no observed issues. So long as there's no danger of force causing connection to 'slip' and make the sides of the triangle unequal you're golden. You may infer that I've tried things that did 'slip'....
Grizz
(alias ProfessorHammock on youtube)
Thanks Grizz. My guess is that slippage is more likely to occur without a load or during loading. Once loaded it should be more stable, but the locked brummel loop would insure the stability.
Stoikurt
"Work to Live...Don't Live to Work!"

Very nice!
I've been considering ways to further reduce the weight of my Warbonnet Ridgerunner suspension. Your triangle design looks like a perfect way to shave some grams on the triangle, and looks like it'll work perfectly with the new speed hooks.
A few questions ...
Just to clarify, your apex loop isn't dependent on the hammock ridgeline for support, is it?
If you have the time, could you outline the steps you took to create your triangle? I'm assuming the apex loop is made before the end loops, but I'd rather not experiment. How long are the legs of your triangle, and what length of amsteel did you start with the get those lengths (assuming a locked brummel apex)?
The ridgeline is there just for convenience and has nothing to do with the loop.
The measurements are the same that Grizz detailed in his video tutorial, 9" for the soft shackle plus 30" (approx. 80-85% of the spreader width) plus 30" again plus 9" again. I added about 2.5-3 inches for the locked brummel apex loop. I did the loop first then the soft shackles in each end. It's a little tricky because you have to widen the hole a good bit to pass the apex loop and the soft shackle through it, but it can be done without too much difficulty.
Of course it'll be shorter if your foot end is less than the head end. The diamond knot loops also give you an extra couple inches in the triangle that you might need to account for if you attach the triangle differently.
Stoikurt
"Work to Live...Don't Live to Work!"
 Posting Permissions

 Reply With Quote

Bookmarks